REPAIR
Change Belt:
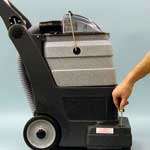
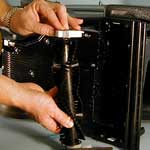
1) Remove caps and screws:
Make sure that the machines power cord is unplugged from the wall before starting this repair. Gain access to the working parts of the machine by popping off the two plastic caps found in the front corners of the machine base. Using a Phillips head screwdriver remove the screw found under each cap.
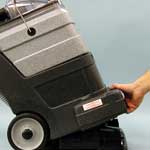
2) Open machine:
Open the machine by tilting back the machine body while holding the base down. The body will pivot back on the machines axle until it lays flat on the work surface. You should now be able to see the interior working parts of the machine, such as the vacuum, pump, brush drive motor and belt.
3) Remove belt limit bracket:
Pull straight up on the belt limit bracket and it will slide out allowing the belt to be removed from the belt motor pulley.
4) Brush removal and belt replacement:
Using a Phillips head screwdriver remove the 4 screws that hold both the right and left brush retainer covers in place. Gently pull the brush down and away from the machine body while holding the brush retainers onto each end. Once the brush is separated from the machine replace the belt, check the brush ends for carpet fibers and debris and clean if necessary. Replace the brush and reassemble the machine.
Change Brush Motor
1) Remove caps and screws:
Make sure that the machines power cord is unplugged from the wall before starting this repair. Gain access to the working parts of the machine by popping off the two plastic caps found in the front corners of the machine base. Using a Phillips head screwdriver remove the screw found under each cap.
2) Open machine:
Open the machine by tilting back the machine body while holding the base down. The body will pivot back on the machines axle until it lays flat on the work surface. You should now be able to see the interior working parts of the machine, such as the vacuum, pump, brush drive motor and belt.
3) Remove belt limit bracket:
Pull straight up on the belt limit bracket and it will slide out allowing the belt to be removed from the belt motor pulley.
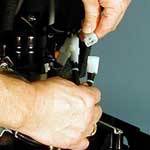
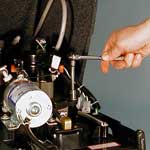
4) Replace brush drive motor:
Unplug the brush motor wiring harness by pulling plastic connectors apart. (Pull only on plastic ends not wire). Remove the four Phillips head screws and two brush motor clamps that secure the motor in place. The motor is held tightly in position by rubber motor mounts that slide into the chassis on both ends. To remove, grasp brush motor and pull up and away from machine. (It may be necessary to gently “pry” the rubber motor mounts lose if they have become stuck in place). Pull brush motor out and place rubber mounts on new motor. A light spray of WD40 on the motor mounts will make reassembly easier. Push new motor with mounts back into position in the chassis, reconnect wire harness, replace motor clamps and screws, place belt onto motor pulley and slide belt limit bracket into place to finish repair.
Change Vacuum Motor
1) Remove caps and screws:
Make sure that the machines power cord is unplugged from the wall before starting this repair. Gain access to the working parts of the machine by popping off the two plastic caps found in the front corners of the machine base. Using a Phillips head screwdriver remove the screw found under each cap.
2) Open machine:
Open the machine by tilting back the machine body while holding the base down. The body will pivot back on the machines axle until it lays flat on the work surface. You should now be able to see the interior working parts of the machine, such as the vacuum, pump, brush drive motor and belt.
3) Replace Vacuum Motor:
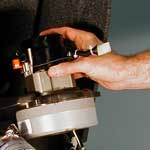
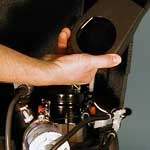
Remove plastic intercooler from top of vacuum by pulling up and off of unit. Unplug the vacuum motor wiring harness by pulling plastic connectors apart. (Pull only on plastic ends not wire). Remove the 3 vacuum motor assembly bolts that hold the unit in place. Gently rock the vacuum motor back and forth until the vacuum motor foam gasket located on its base breaks free of the chassis. (If the vacuum motor has been in place for quite some time the foam gasket may rip upon motor removal. Always inspect the gasket after removal and replace if necessary). Pull motor up and away from the chassis to remove.
Install new vacuum motor (with new gasket if necessary) onto the base making sure the bolts and the holes properly line up. When replacing vacuum motor assembly bolts be careful not to over-tighten. Over tightening can crush the plastic vacuum fan. Tighten only enough to provide a good seal on the bottom gasket. Tighten all bolts gradually moving from bolt to bolt. Do not tighten one all the way and then move to the next. Reconnect the wiring harness and reinstall snorkel to complete the repair.
Change Pump Motor
1) Remove caps and screws:
Make sure that the machines power cord is unplugged from the wall before starting this repair. Gain access to the working parts of the machine by popping off the two plastic caps found in the front corners of the machine base. Using a Phillips head screwdriver remove the screw found under each cap.
2) Open machine:
Open the machine by tilting back the machine body while holding the base down. The body will pivot back on the machines axle until it lays flat on the work surface. You should now be able to see the interior working parts of the machine, such as the vacuum, pump, brush drive motor and belt.
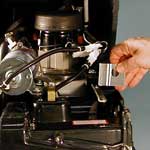
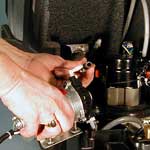
3) Replace Pump:
Remove plastic intercooler from top of vacuum by pulling up and off of unit. Unplug the pumps wiring harness by pulling plastic connectors apart. (Pull only on plastic ends not wire). Using a Phillips head screwdriver remove the 4 mounting screws that hold the pump to the chassis. Next, loosen the hose clamps for both the inlet and outlet hoses and pull hoses off of nylon hose barbs. (Note: The high-pressure water hose can be very difficult to remove from the nylon hose barb. Removal is made easier if the hose is warmed with either a hair dryer or a small towel made hot with water. Be careful not to overheat.).
Before installing new pump, lightly file or sand ridges on both nylon hose barbs to simplify hose removal in the future. Tighten hose clamps, replace screws holding pump onto chassis and reconnect electrical wiring to finish repair.
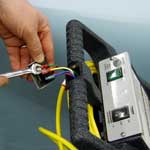
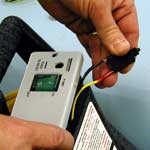
Circuit Breaker Replacement
Make sure that the machines power cord is unplugged from the wall before starting this repair. Remove the 2 Phillips head screws holding the electrical switch plate in place. Gently pull the switch plate away from the machine to expose the backside of the switches. While holding the back of the circuit breaker in place unscrew the clear rubber circuit breaker seal from the front and remove. The circuit breaker will now come off of the switch plate. Next, unplug the wires from the old circuit breaker and plug into the new unit. Push the new circuit breaker into the switch plate, screw the rubber seal back onto the front and reattach the switch plate to complete the repair.
Carpet / Upholstery, or Pump Switch Replacement:
Make sure that the machines power cord is unplugged from the wall before starting this repair. Remove the 2 Phillips head screws holding the electrical switch plate in place. Gently pull the switch plate away from the machine to expose the backside of the switches. Remove the retaining nuts that hold the broken switch in place and pull switch off of switch plate. With both the old and new switches in hand begin transferring wires one by one from old to new being careful to place the wires on the correct post of the new switch. With the wiring completed, place switch onto switch plate and replace retaining nuts. Refasten the switch plate to the machine to complete the repair.

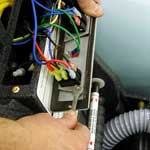
Brush / Spray Switch Replacement:
Make sure that the machines power cord is unplugged from the wall before starting this repair. Remove the 2 Phillips head screws holding the electrical switch plate in place. Gently pull the switch plate away from the machine to expose the backside of the switch. Remove the retaining nuts that hold the broken switch in place and pull switch off of switch plate. With both the old and new switches in hand begin transferring wires one by one from old to new being careful to place the wires on the correct post of the new switch. With the wiring completed, place switch onto switch plate and replace retaining nuts. Refasten the switch plate to the machine to complete the repair.